
The export mechanism of raster images with scaling in FIGMA is useful for Android and iOS developers. This is due to the different pixel density on the screens of mobile devices. For maximum use of devices, it is recommended to export images to a specific pixel density.
Android developers in export from FIGMA use scaling X1, X1.5, X2, X3 and X4. IOS developers prefer X1, X2 and X3.
Android developers in export from FIGMA use scaling X1, X1.5, X2, X3 and X4. IOS developers prefer X1, X2 and X3.

Retina displays
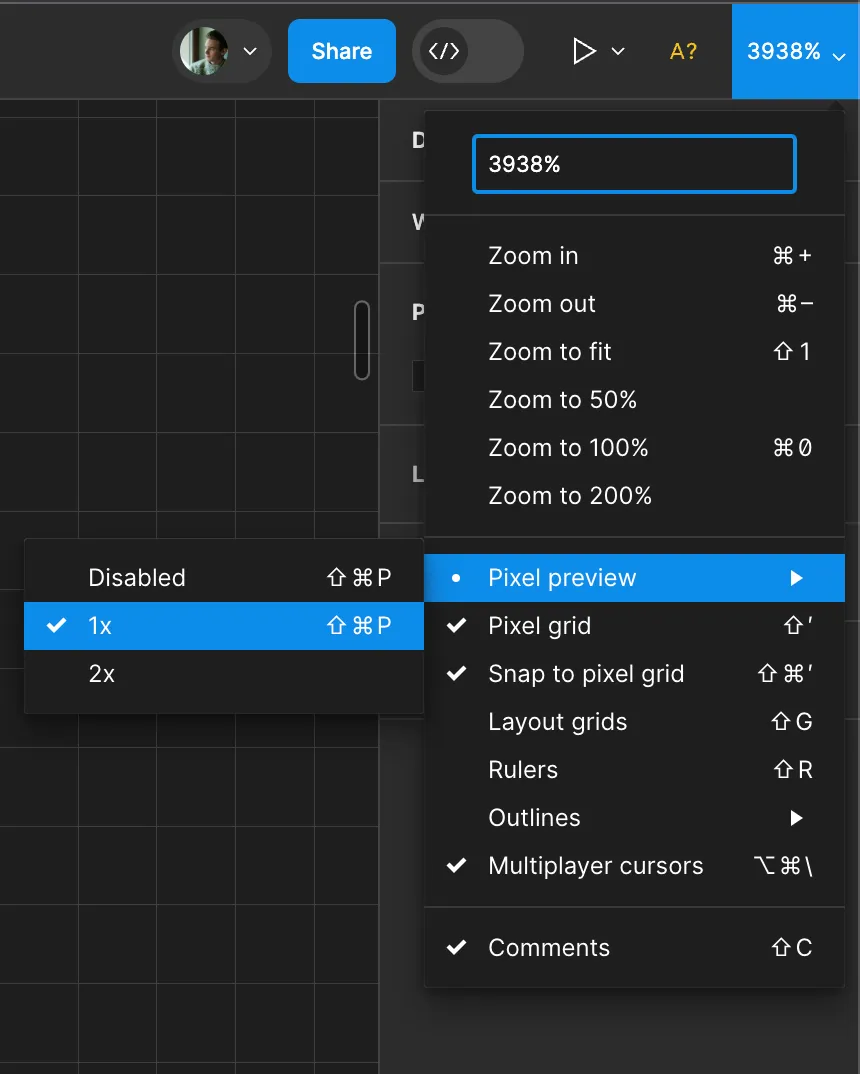
If you have a Retina display, Figma will automatically increase the pixel density. This is useful for viewing design, but after export the question may arise: why does the image with export in X1 look worse than in Figma? To turn off the adaptation to Retina, go to Zoom/View Options in the upper right corner, then select Pixel Preview -> "1x".
If you have a Retina display, Figma will automatically increase the pixel density. This is useful for viewing design, but after export the question may arise: why does the image with export in X1 look worse than in Figma? To turn off the adaptation to Retina, go to Zoom/View Options in the upper right corner, then select Pixel Preview -> "1x".
Below is a comparison of images with the options "1x" and "Disabled".

"1x" option

"Disabled" option
If you want to pre -see how the image will look after export with scaling X1, install 1x in the Pixel Preview menu.
The original raster image in Figma is the key to the maximum quality during export and minimum image sizes
Before you export the image from Figma, someone must import it. The image imported into Figma is the maximum resolution that the user can receive when export. Figma retains the original image and, depending on it, changes the number of pixels when exporting or changing the size inside Figma. Consider how it works with an example.
Suppose the designer loaded a raster image with a size of 200x200 pixels in Figma, and then reduced its height and width in half. At this moment, Figma stores the original image of 200x200 pixels, but the user in Figma sees a reduced image with a size of 100x100 pixels.
Now the developer wants to export the image from Figma (where the image size 100x100 pixels) with the scaling of X1, X2 and X4. As a result, he will receive images in the size of 100x100 pixels, 200x200 pixels and 400x400 pixels, respectively.
When exporting an image with a scaling X1, Figma will cut part of the pixels from the original to get the desired size. When scaling X2, the number of pixels during export will be equal to the original image, and Figma will create a copy of the original for export. In the case of X4, Figma will copy part of the pixels from the original, increasing the number of pixels, but they will duplicate existing pixels.
In other words, Figma takes the size of the exported image based on the size of the area, within which the image is shown. And pixels for an exportable image are taken from the original image.
Thus, if a picture of 200x200 PX has been loaded in Figma, and you export this picture with scaling X2, you will get a more severe image of the data, but the image quality will remain the same.
Below is a comparison of the image quality when the image export with the number of pixels is greater than that of the original.

Maximum image resolution in Figma
Based on the previous information, it can be concluded that for the successful use of the export function with scaling in Figma, it is important to import the image of the highest quality. However, it is worth considering that Figma has a restriction on the size of the imported image. You can not import an image, the width or height of which exceed 4096 pixels. In such cases, Figma automatically compresses the image so that its maximum height or width is 4096 pixels. Typically, images of more than 4096 pixels are not required for work, but it is useful to know about this restriction in Figma.
Based on the previous information, it can be concluded that for the successful use of the export function with scaling in Figma, it is important to import the image of the highest quality. However, it is worth considering that Figma has a restriction on the size of the imported image. You can not import an image, the width or height of which exceed 4096 pixels. In such cases, Figma automatically compresses the image so that its maximum height or width is 4096 pixels. Typically, images of more than 4096 pixels are not required for work, but it is useful to know about this restriction in Figma.
